ADSB.im
Simple to use ADSB Feeder Images
(not
just) for common Single Board Computers
Two Stage Setup
Introduction
In many (most?) instances, a simple integrated feeder is a very good solution for tracking the planes around your
home (or wherever you have installed your feeder). There are a few situations, however, where some people prefer a
different setup. The most common ones are
- a very low end SBC, maybe mounted close to an antenna, that gets bogged down feeding multiple aggregators (especially feeding multiple commercial aggregators that each tend to need their own container and therefore consume more memory)
- concerns about the amount of data written to the SD card in the feeder SBC, or the desire for more robust backups of the data created by the feeder SBC
- the desire to have multiple feeders running in different locations and manage the data sharing from a single system (including having a local combined map of the coverage of all the feeders)
For the third use case above, it is important to feed the data from each feeder individually to each aggregator.
Trying to combine data locally (which some people want to do in order to "game the metrics" that some of the
aggregators provide) actually messes with the MLAT calculations and overall weakens the quality of the data
collected. For example, aggregators can use MLAT information to detect planes that have transponders that are
failing or affected by some of the GPS spoofing happening around the world, especially near conflict zones. This
becomes much harder if people send combined data from multiple feeders that confuse these MLAT calculations. So
please don't do this. The adsb.im feeder image is intentionally not offering any options to do this.
Defining some terms used
Since it can be rather confusing to talk about scenarios like this, here are some terms that are used in the rest of
this document (and in the UI):
- SBC
- A single board computer like a Raspberry Pi or an OrangePi
- SDR
- A software-defined radio, usually a USB stick or a small device connected to USB via cable -- your antenna connects to the SDR
- Integrated Feeder
- A single system (usually an SBC) that has an SDR connected to an antenna attached and that feeds one or more aggregators.
- Micro Feeder / Nano Feeder
- A system (usually an SBC) that has an SDR connected to an antenna attached and does not by itself feed aggregators. The distinction between the two types in the adsb.im feeder image is that a nano feeder tries to reduce data usage and write access to the local SD card even more. It's designed to happily run on a 512MB SBC. To achieve that, it doesn't maintain local graphs or heatmap data and doesn't keep a persistant log (i.e. all logs are lost on reboot).
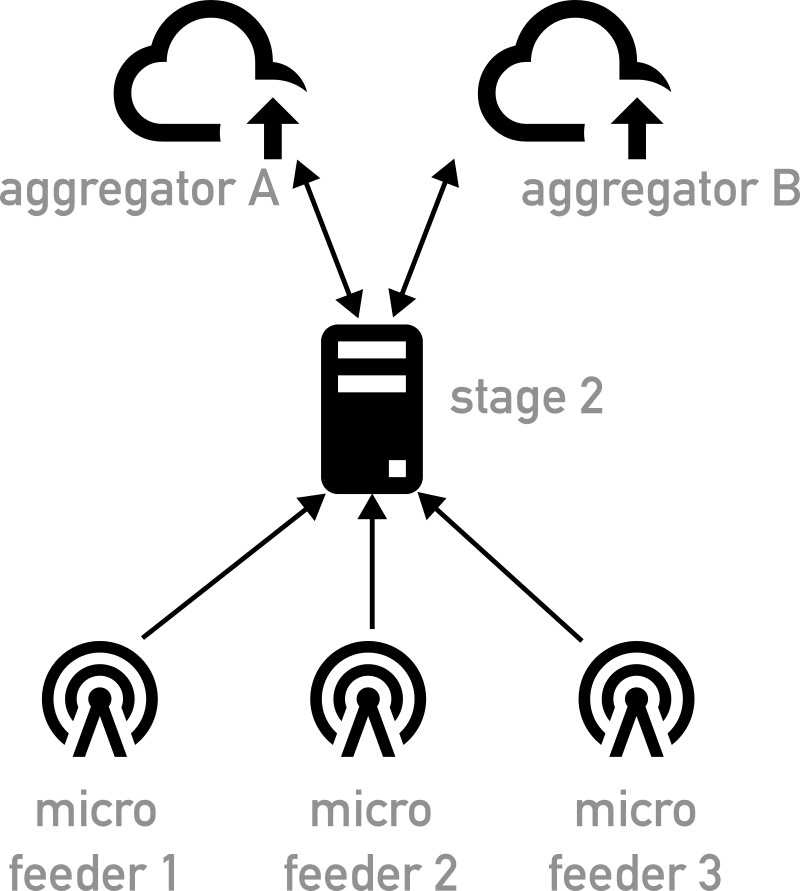
- Stage 2 Instance
- A separate instance of the adsb.im Feeder Image (sometimes running on an SBC, but often running in a VM or as
application on some other system) that usually has no SDR attached, but instead receives data
from one or more Micro Feeders and feeds the data (individually, see above) to one or more
aggregators.
It is possible to have a stage 2 instance do double duty both as nano feeder and as stage 2 instance, i.e. to have a local SDR connected to a stage 2 instance, but that's a bit of a corner case and not the recommended setup. It was mostly implemented for scenarios like someone needing two SDRs / antennas to cover their local traffic (e.g. when an antenna on the roof isn't possible and two SBCs are used, sitting in windows looking in different directions). Here it might be easiest to have one of the SBCs do double duty both as feeder with an SDR and as stage 2 instance. I highly recommend that this should be an RPi 4 with at least 2GB of RAM or some other somewhat more powerful SBC (e.g. an OrangePi 5 or 5 Plus).
Creating a Stage 2 Instance
The recommended approach would be to create a new adsb.im Feeder Image installation from scratch; converting an
existing feeder image could cause unintended effects and is mostly untested. Most of the testing is done running a
Stage 2 Instance in a VM, additionally some testing is done with a Raspberry Pi 5 and an Orange Pi 5 Plus using NVMe
storage (note that by its nature a stage 2 instance will store more data to its storage device, so if you run this
on an SD card based SBC, lifetime of your SD card could become an issue). The rest of this chapter assumes that you
already have an Integrated Feeder running and are interested in converting this to a two stage system.
- Boot the new instance and enter the name for your Stage 2 (something like DND_Stage2 is what I tend to end up with) as well as your location (that will be the initial center of the combined map).
- Select "Stage 2" at the bottom of the Setup page and click on Submit.
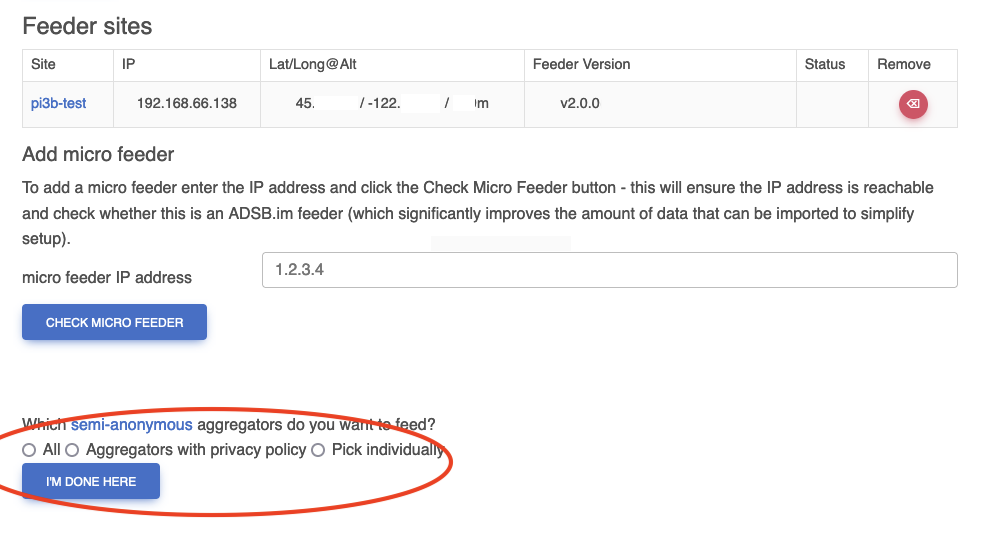
- At this point you will be forwarded to the Stage 2 Setup page. Here you add the Micro Feeder(s) that you want to consume data from.
- Enter the IP address of the existing Integrated Feeder that you want to use as the data source and click on "Check Micro Feeder". Yes, you are pointing this at an Integrated Feeder right now -- we'll convert that system to a Micro Feeder later.
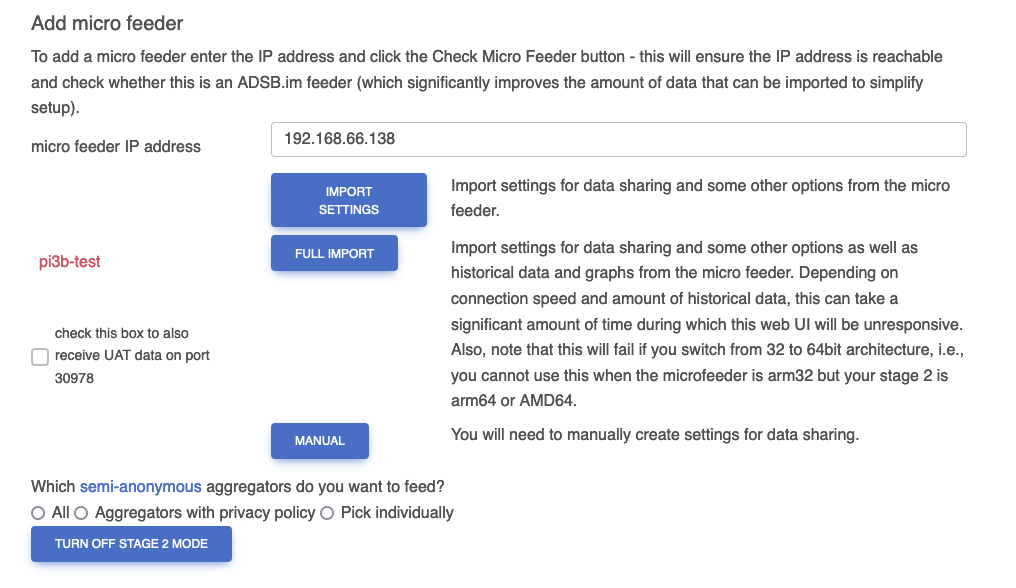
- Assuming that this is a v2 adsb.im Feeder Image, you will now be presented with the name of that feeder in red
plus three options for the integration:
- Import Settings: name, location, and data sharing settings are imported - the Stage 2 Instance will continue to feed the same aggregators with the same data which should allow for a seamless transition
- Full Import: just like in the previous scenario, all settings are imported, but additionally the historical data, graphs and statistics are imported as well. This can take quite a while, especially from a feeder that has been up and running for a long time. Please be patient.
- Manual: no settings are imported, you have to enter all data again from scratch
- If the feeder you are connecting to isn't an adsb.im Feeder Image, you'll still be able to connect to it, but you'll have to set things up manually.
- Once you have all Micro Feeders added (you can of course come back here at any time later to make changes), pick the settings for the semi-anonymous aggregators that you prefer and click on "I'm Done Here".


The stage 2 system will now add all the necessary containers and set things up accordingly. Depending on how many
Micro Feeders you added and how many commercial aggregator those are feeding, this once again can take a while. When
that process has completed, you will be presented with a slightly modified UI.
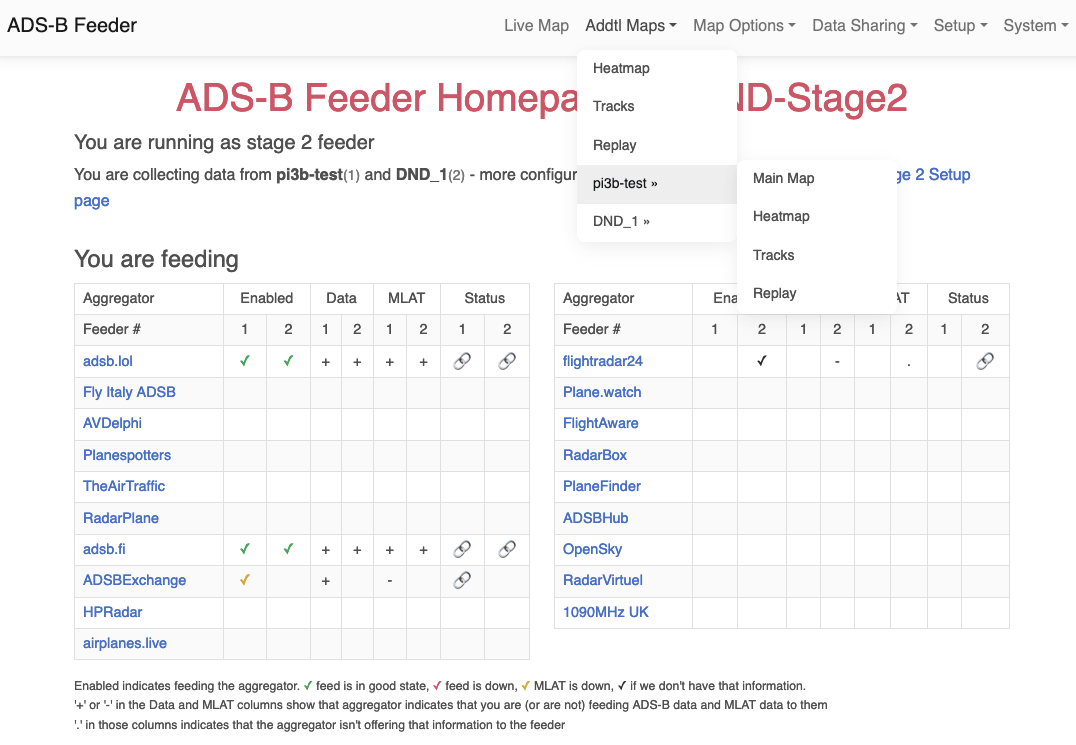
On the Stage 2 Instance home page you'll see the (potentially expanded) grid of aggregators. If you have more
than one Micro Feeder, this will present you with information on all of them in one chart.
The main menu bar will have converted the "Map Options" and "Data Sharing" entries to drop down menues that give
you access to the settings for each of the micro feeders. And the "Addtl Maps" menu entry will give you access to
individual maps and graphs for each of the Micro Feeders. The Main Map will now show the combined data from all of
the configured feeders.
Once this is all working and looking good, you can connect to the feeder images for the Micro Feeders (an easy
way to do this is to return to the Stage 2 Setup page and click on the name of the Micro Feeder in the table) and go
to the Basic Setup page for each of them and convert it to a Micro Feeder at the bottom of that page. Click Submit
and you should be done.
Micro Feeder considerations
In most cases, you'll have your first Micro Feeder on your local network, but of course it's reasonable to expect
that all additional ones will be somewhere else. The easiest way to deal with this tends to be to simply set up one
of the free VPN services. The adsb.im Feeder Image supports two of them out of the box. Tailscale (which seems to be
better for latency in my experience) and Zerotier (which may be marginally easier to set up initially). I'll link to
more in depth documentation for that later.
Ongoing Use
Once things are set up, you usually don't need to go back to the Micro Feeder address - except for occasional system
updates (assuming you didn't automate that already). Maps, statistics, aggregator status, etc., are all accessible
from the Stage 2 Instance web interface.