ADSB.im
Simple to use ADSB Feeder Images
(not
just) for common Single Board Computers
The easiest way to track nearby aircraft, ships, or even weather balloons with your own hardware and share with others
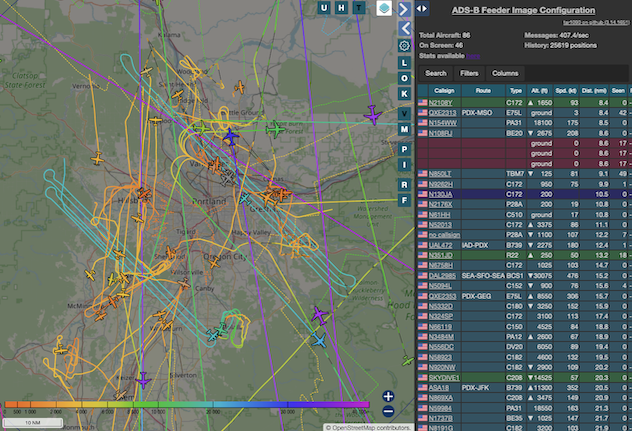
The image on the leftabove
shows the planes above me right now, their recent tracks, more information about altitude, speed, and for
many commercial flights even the flight route.
Plot aircraft on your own map, and share to aggregators like
adsb.lol,
Fly Italy Adsb,
TheAirTraffic,
adsb.fi,
sdrmap,
1090MHz UK,
ADS-B Exchange,
ADSBHub,
HPRadar,
airplanes.live,
AVDelphi,
FlightAware,
FlightRadar24,
OpenSky Network,
Plane.watch,
Plane Finder,
Planespotters.net,
AirNav Radar,
Radar Virtuel, and more!
The ADS-B Feeder Image started initially as a way to make it easier to set up an ADS-B feeder - but by now it has expanded to support AIS (to track ships), Sonde (to track weather balloons), and ACARS/VDL2/HFDL to receive data transmitions from aircraft to ground stations. Each of these areas have their own aggregators, their own communities, and their own fascinations. What they have in common is that with the Feeder Image it is very easy to get setup and get started.
How to Install
- Start with one of the supported single board computers.
- Add an SDR radio dongle and an antenna
- Download the matching SD-card image and write it to an SD-card
- Boot your SBC and wait a little while (depending on the model and the specific image this usually takes a few minutes, but in some cases this can take 15 to 20 minutes)
- If you have wired Ethernet, or after you have configured WiFi simply go to http://adsb-feeder.local or (if you don't have working mDNS on your home network) to my.adsb.im which should redirect you to your new ADS-B feeder.
- If you are planning to use WiFi and weren't able to configure that while writing the SD card,
the image will create a WiFi hotspot
adsb.im-feederthat you can connect to in order to enter the credentials for it to connect to your WiFi network. More details for this on our Hotspot Page
- On current versions of DietPi, this is as simple as using
dietpi-softwareand searching for app number 141 (or for ADS-B Feeder). - Once you install that application, you can connect to the web UI via
http://{local name or IP}:1099 - Of course, you still need a supported SDR and an antenna connected to the DietPi system.
- On most recent Debian / Ubuntu based Linux systems running on ARM64 or x86 systems, you can install the ADS-B Feeder Image as an app
curl https://raw.githubusercontent.com/dirkhh/adsb-feeder-image/main/src/tools/app-install.sh | sudo bash- Or, more reasonably, download the shell script, read and review what it does, and then run it as root
- Once you install that application, you can connect to the web UI via
http://{local name or IP}:1099 - Of course, you still need a supported SDR and an antenna connected to the Linux system
Some screenshots
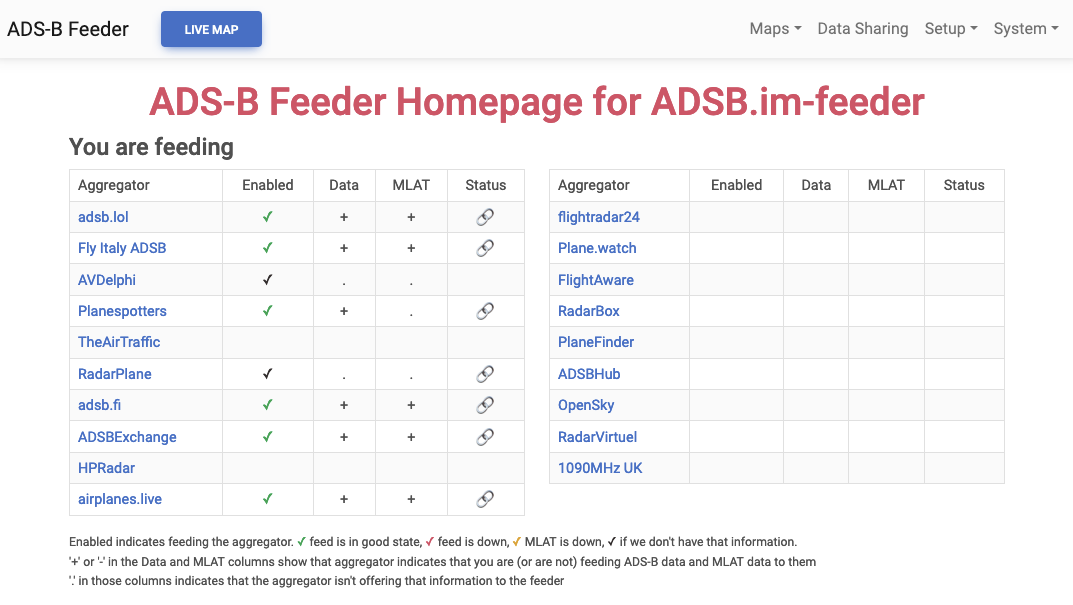
Once you are up and running with the web UI
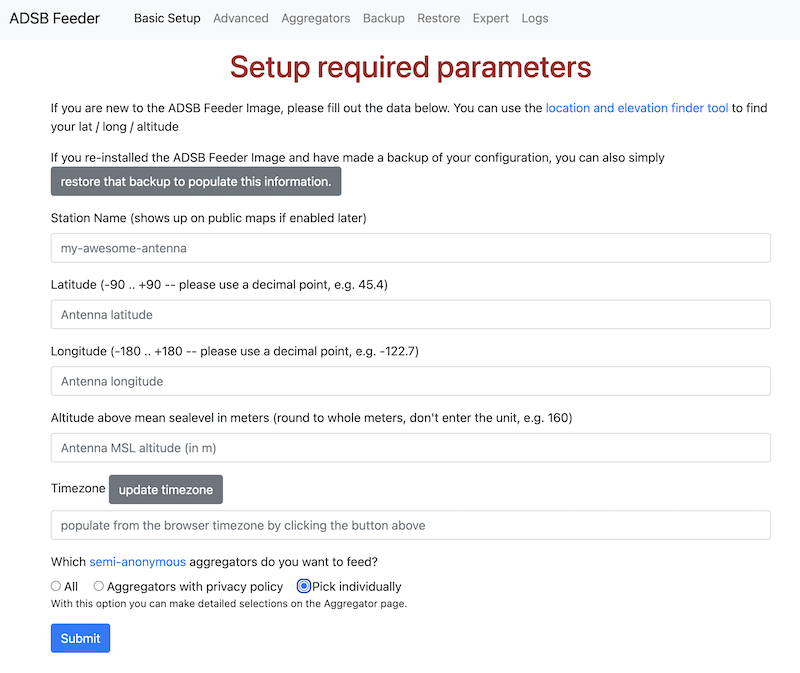
The first page the Feeder will show you is the basic setup page. Here you can:- Give your feeder station a name (used for the map website and aggregator MLAT graphs).
- Enter the physical location of the antenna (there is a link to a useful tool if you need help finding the correct latitude, longitude, and elevation).
- Enter the time zone (again, there's a button to make this straight forward).
- Select the initial set of aggregators your want to send data to.
- Click on Setup - unless you decided to manually select aggregators or have multiple SDRs or some other unusual circumstances, this is all it takes to get started. Next the web UI will redirect you to the ADS-B Feeder home page from where you can manage your feeder station.
For help, questions, or to see the source code
- Feeder Image Zulip channel on adsb.lol's Zulip server
#support-1channel on the ADS-B / SDR Feeder Image Discord server- Feeder Image GitHub project